Archive for the ‘CICS’ Category
DPL (Distributed Program Link) enables a Local CICS program to issue a EXEC CICS LINK to a program in the remote CICS region which return control to the calling program. DPL provides the below advantages for a CICS application.
- It allows a non OS390/zOS application to use DL/I, SQL, BDAM and VSAM files owned by a zOS/os390 system.
- Allows CICS programmer to use LU 6.2 link Protocol without knowing the protocol.
Restrictions of DPL.
You cannot use the below CICS services on the remote application.
- You cannot issue any terminal control commands. e.g. SEND, RECEIVE.
- No BMS commands.
- No security commands like SIGNON or SIGNOFF.
If you are receiving any abends on the remote application and it didn’t handle the abend by itself then, abend code will returned to the Main program.
Defining and installing CICS entries.
Assume that you have a Mainframe connectivity like below.
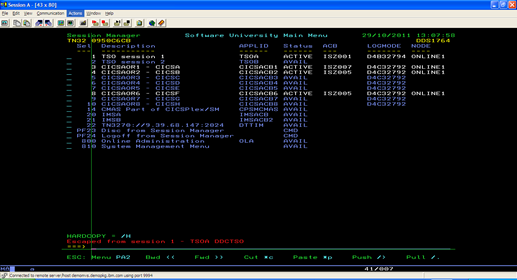
Here I have 2 TSO sessions, 8 CICS regions, 2 IMS, 1 CICSPlex/SM and few Session manager setups and Misce sessions.
I am using the CICSA and CICSB regions, I.e my Main program is in CICSA and it then calling the program on CICSB using a COMMAREA, second program will write the message passed in commarea into a VSAM file, set a message onto COMMAREA and returns into CICSA region.
Before you are getting started with your program, make sure that MRO/ISC is configured in your Mainframe, you can contact you system Admin or follow my instructions below.
- Go to your CICS region batch job in spool.
- Open the JESYSMSG and Check for ISC and IRCSTRT init parms are setup to YES.
- IF the above initparms are not setup to YES then you need to ask your sysadmin to set this up before you continue with DPL program.
Usually SYSADMIN do the below steps to setup ISC or IRCSTRT.
- Bring down CICS region using master console or Perform SHUTDOWN using CEMT.
- Find SIP parameter for the region.
- Go to SYSIN PDS of the Installed CICS TS.
- Find the DFH$SIP<SIP PARM> member and add the ISC and IRCSTRT parms.
- Restart CICS region.
You can also issue a CEMT I IRC to check whether IRC is setup for the region.
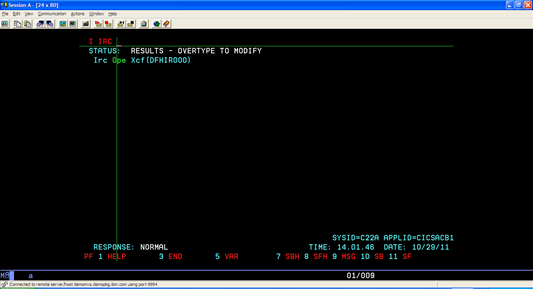
Steps to create CICS table entries for a DPL program.
- Define and Install the main program on LOCAL CICS region as usual.
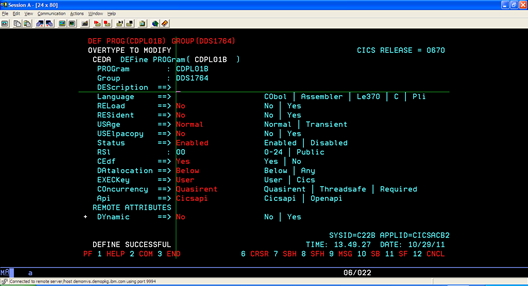
- Define and install Mirror Entries of remote CICS transaction and program on LOCAL CIS region. Set the remote Attributes (Remote System as the 4 digit remote CICS region ID, and program name) You can see the remote system ID on SYSID field once you issue a CEMT/CEDA command (See below screenshots).
- Go to Remote CICS region and define and Install only remote Program and Transaction.
- Compile CICS programs and move Load module to the respective libraries of local and Remote CICS regions.
- Perform New copy for the Local program on Local CICS region and Remote program on remote region.
- Invoke the Local CICS program using the defined Transaction on Local CICS region.
DPL Sample program
Main program.
|
IDENTIFICATION DIVISION.
PROGRAM-ID. CDPL01A.
AUTHOR. SHIBU.T.
*
DATA DIVISION.
WORKING-STORAGE SECTION.
77 WS-MSG-1 PIC X(100).
77 WS-MSG-LEN PIC S9(4) COMP.
*
01 WS-COMMAREA.
02 WS-RECID PIC X(10).
02 WS-MSG PIC X(40).
02 WS-PROG-ID PIC X(08).
LINKAGE SECTION.
01 DFHCOMMAREA.
02 LS-COMMAREA.
03 LS-RECID PIC X(10).
03 LS-MSG PIC X(40).
03 LS-PROG-ID PIC X(08).
PROCEDURE DIVISION.
A0001-MAIN-PARA.
MOVE SPACES TO WS-COMMAREA WS-MSG-1.
IF EIBCALEN = 0 THEN
PERFORM A00150-INITIALIZE
ELSE
PERFORM A00200-LINK
END-IF.
*
A00150-INITIALIZE.
MOVE ‘PROGRAM ON CICSAOR1 REGION’
TO WS-MSG.
MOVE ‘1000000123’ TO WS-RECID.
MOVE ‘CDPL01A’ TO WS-PROG-ID.
MOVE ‘WS-MSG BEFORE DPL: ‘ TO WS-MSG-1(1:20).
MOVE WS-MSG TO WS-MSG-1(21:26).
MOVE ‘* PROGRAM-ID: ‘ TO WS-MSG-1(47:14).
MOVE WS-PROG-ID TO WS-MSG-1(61:08).
EXEC CICS SEND TEXT
FROM(WS-MSG-1)
ERASE
END-EXEC.
EXEC CICS RETURN
TRANSID(‘AA05’)
COMMAREA(WS-COMMAREA)
END-EXEC.
*
A00200-LINK.
MOVE LS-COMMAREA TO WS-COMMAREA.
EXEC CICS LINK
PROGRAM(‘CDPL01B’)
COMMAREA(WS-COMMAREA)
END-EXEC.
MOVE SPACES TO WS-MSG-1.
MOVE ‘WS-MSG AFTER DPL: ‘ TO WS-MSG-1(1:20).
MOVE WS-MSG TO WS-MSG-1(21:26).
MOVE ‘* PROGRAM-ID: ‘ TO WS-MSG-1(47:14).
MOVE WS-PROG-ID TO WS-MSG-1(61:08).
EXEC CICS SEND TEXT
FROM(WS-MSG-1)
ERASE
END-EXEC.
EXEC CICS RETURN
END-EXEC.
|
Sub Program on Remote region.
|
IDENTIFICATION DIVISION.
PROGRAM-ID. CDPL01B.
AUTHOR. SHIBU.T.
*
DATA DIVISION.
WORKING-STORAGE SECTION.
77 WS-MSG-1 PIC X(100).
77 WS-MSG-LEN PIC S9(4) COMP.
01 WS-FILE-DT.
02 WS-DAT.
03 WS-KEY PIC X(10).
03 WS-DAT1 PIC X(40) VALUE SPACES.
03 PIC X(60) VALUE SPACES.
*
01 WS-COMMAREA.
02 WS-RECID PIC X(10) VALUE SPACES.
02 WS-MSG PIC X(40).
02 WS-PROG-ID PIC X(08).
LINKAGE SECTION.
01 DFHCOMMAREA.
02 LS-COMMAREA.
03 LS-RECID PIC X(10).
03 LS-MSG PIC X(40).
03 LS-PROG-ID PIC X(08).
PROCEDURE DIVISION USING DFHCOMMAREA.
A0001-MAIN-PARA.
* MOVE SPACES TO WS-COMMAREA WS-MSG-1.
MOVE LS-RECID TO WS-KEY.
MOVE LS-MSG TO WS-DAT1.
EXEC CICS WRITE
DATASET(‘VFILE1’)
FROM(WS-DAT)
LENGTH(LENGTH OF WS-DAT)
RIDFLD(WS-KEY)
END-EXEC.
MOVE ‘PROGRAM ON CICSAORB REGION’
TO WS-MSG.
MOVE ‘CDPL01B’ TO WS-PROG-ID.
MOVE WS-COMMAREA TO LS-COMMAREA.
EXEC CICS RETURN
END-EXEC.
|
Compile aCICS programs and Move load modules to respective LOAD LIBS of CICS regions.
Please refer to https://mainframegeek.wordpress.com/2011/10/11/prepare-compile-define-install-execute-a-cics-cobol-program/ for more info on how to prepare compile a COBOL-CICS program, how to find LOAD LIB od CICS region and move the Load module.
Defining and Installing Resources to CICS.
On CICS REGION CICSA
Step 1 Create and Install Program entries for the Main program on CICSA, defining is similar to a normal CICS program.
![clip_image002[12] clip_image002[12]](https://mainframegeek.files.wordpress.com/2011/10/clip_image00212_thumb.jpg?w=534&h=386)
Step 2 Install the program.
![clip_image002[32] clip_image002[32]](https://mainframegeek.files.wordpress.com/2011/10/clip_image00232_thumb.jpg?w=524&h=378)
Step 3 Define Transaction Entry for Main program on CICSA, you need to mention main program name (CDPL01A) while defining Transaction entry.
![clip_image002[8] clip_image002[8]](https://mainframegeek.files.wordpress.com/2011/10/clip_image0028_thumb.jpg?w=522&h=376)
Step 4 Install the transaction.
![clip_image002[10] clip_image002[10]](https://mainframegeek.files.wordpress.com/2011/10/clip_image00210_thumb.jpg?w=521&h=376)
Step 5 Define Mirror Program.
![clip_image002[14] clip_image002[14]](https://mainframegeek.files.wordpress.com/2011/10/clip_image00214_thumb.jpg?w=524&h=378)
![clip_image002[16] clip_image002[16]](https://mainframegeek.files.wordpress.com/2011/10/clip_image00216_thumb.jpg?w=527&h=380)
![clip_image002[18] clip_image002[18]](https://mainframegeek.files.wordpress.com/2011/10/clip_image00218_thumb.jpg?w=531&h=383)
Step 6 Define and Install Mirror Transaction.
![clip_image002[22] clip_image002[22]](https://mainframegeek.files.wordpress.com/2011/10/clip_image00222_thumb.jpg?w=531&h=383)
![clip_image002[24] clip_image002[24]](https://mainframegeek.files.wordpress.com/2011/10/clip_image00224_thumb.jpg?w=535&h=386)
![clip_image002[26] clip_image002[26]](https://mainframegeek.files.wordpress.com/2011/10/clip_image00226_thumb.jpg?w=533&h=384)
on remote region
Step 7 Define, Install Program and Transaction entries .
![clip_image002[6] clip_image002[6]](https://mainframegeek.files.wordpress.com/2011/10/clip_image0026_thumb.jpg?w=529&h=381)
![clip_image002[28] clip_image002[28]](https://mainframegeek.files.wordpress.com/2011/10/clip_image00228_thumb.jpg?w=525&h=379)
![clip_image002[30] clip_image002[30]](https://mainframegeek.files.wordpress.com/2011/10/clip_image00230_thumb.jpg?w=523&h=377)
Step 9 Execute Program.
Issue AA05 on CICSA to execute program, do a cedf if you want to see what is exactly happening in the program. This is a pseudo-conversation program, it displays commarea content before links to the remote app. Press enter to issue LINK.
![clip_image002[34] clip_image002[34]](https://mainframegeek.files.wordpress.com/2011/10/clip_image00234_thumb.jpg?w=520&h=375)
![clip_image002[36] clip_image002[36]](https://mainframegeek.files.wordpress.com/2011/10/clip_image00236_thumb.jpg?w=523&h=377)
Control came back from Remote app, you can see the commarea contents which set up by remote app.
You can also open the file to ensure that Remote app is getitng COMMAREA conts correctly ( Remote app will write the commarea contents to VSAM file). Look for th last line, that is the message passed on commarea.
![clip_image002[38] clip_image002[38]](https://mainframegeek.files.wordpress.com/2011/10/clip_image00238_thumb.jpg?w=530&h=364)
Here I’m trying to cover the necessary steps to Prepare, Compile, Define and Execute a CICS COBOL program, Technically there no difference in Link edit, Define, Install and Execute a COBOL program and the programs prepared in any other languages such as Assembler, C/C++, PL\1. But yes there is difference in compiling object codes.
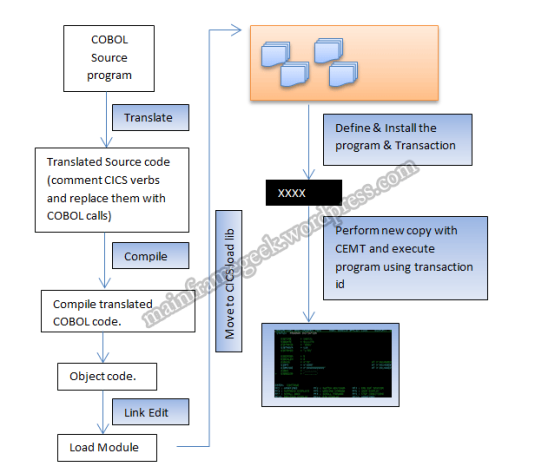
Step 1. Compile/Link edit a CICS COBOL Program.
IBM has supplied a standard procedure for Compile and link edit CICS-COBOL code. The pre-compile ( Translating ) will comment all the CICS commands from the source code and then replace them with specific COBOL call statements. This translated source code then passed to Compile step, which will compile the source code and create the object code. The Cobol compilation is done with IGYCRCTL compiler program. The object code then given as input to the IBM linkedit program. you can use HEWL or IEWL for this purpose, you can find this program in CEE.SCEELKED or CEE.SCEECICS this may be different in your system. The IBM supplied standard procedure name is DFHEITVL. You can find this proc in SDFHPROC,of the CICS base location. for me it was CICSTS42.CICS.SDFHPROC. And of course you can see a lot of other procs in the CICS proclib, some of them can be used for CICS-DB2-COBOL, CICS-Assempler, CICS-C/C++, CICS-PL\1 or compile and link edit BMS Maps etc. you can then use the below jcl for precompile, Compile and Link edit your program.
|
//DDS1764J JOB ‘SHIBU THANNIKKUNNATH’,NOTIFY=&SYSUID
//IBMLIB JCLLIB ORDER=CICSTS42.CICS.SDFHPROC
//CPLSTP EXEC DFHEITVL
//TRN.SYSIN DD DSN=TSHRCI.PGMG.CICOB(PGM1),DISP=SHR
//LKED.SYSIN DD *
NAME PGM1(R)
//
|
make sure that the PROGLIB in the DFHEITVL is pointed to your CICS loadlib. If you are not sure about this you can go to The JESJCL of the job for your CICS region in Spool and check for DFHRPL dd statement.
Step 2. DEFINE and INSTALL PROGRAM and TRANSACTION Entries.
You should have Administration privileges to do the below steps.
Define Program Entries.
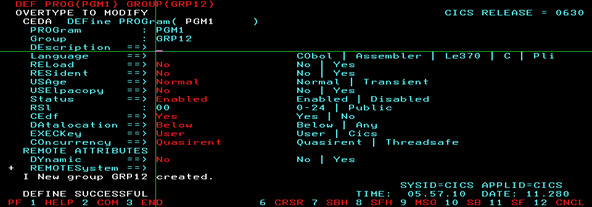
To define a CICS prog entry, you can issue CEDA DEF PROG( Program ID) GROUP(group ID). If the group doesn’t exist in the system them CICS will create a new group for you. If your program lies in the same CICS region itself then the mandatory values are Program Id and Group name. If your program is a Remote program , lies in a different CICS region then you need to have the destination CICS region ID and remote Program ID in addition to the program Id and group ID.
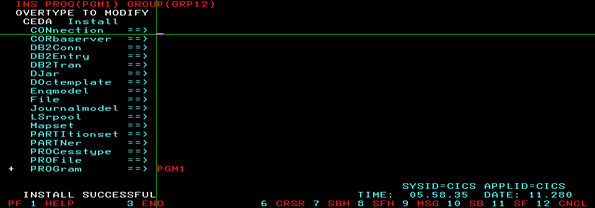
Install the Program ID
You can issue a CEDA INS PROG(Program id) GROUP(Group ID). the group and program are must be defined in the system.
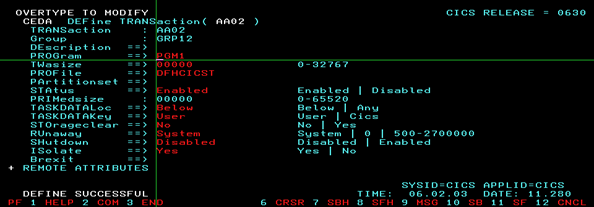
Define Transaction ID
You can Issue a CEDA DEF TRANS(transaction id) group(group id) for this. If the group is not existing in the system then group will be created by CICS. You must Give Program ID (associated with the trans-id) while defining Transaction. Again if your transaction is for a remote program then you must provide the destination CICS region ID and destination transaction name.
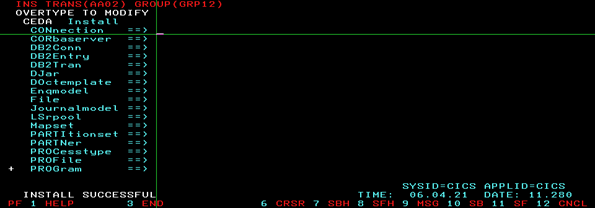
Then Issue CEDA INS TRANS(Transaction ID) GROUP( Group ID) to install the transaction id.
Step 3. Run The Program
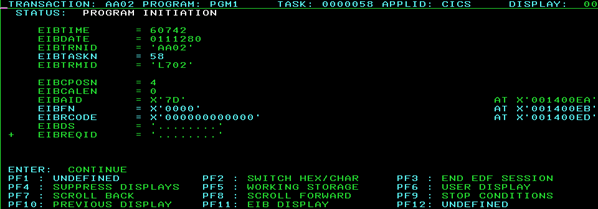
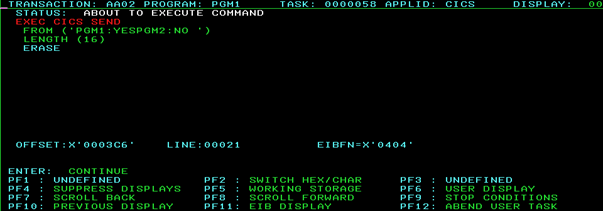
You can just enter the transaction Id associated with the program to execute it. You can also use CEDF for debugging mode, in CEDF you can see the step by step execution of CICS commands in your program, you can also see the working storage section, EIB Fields values and lot mode when you use CEDF.
Executing with CEDF
Execution without CEDF
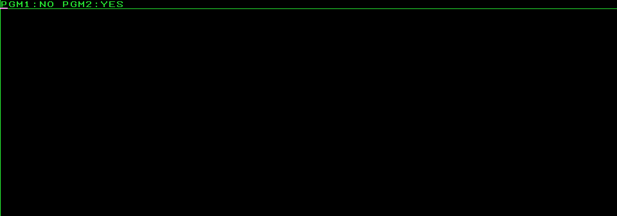
here is my CICS-COBOL Source code.. This is a Link program, but I’m not giving my second program’s source code, please comment in this post if you guys want me to post my second program.
|
Identification division.
Program-id. pgm1.
author. shibu.t.
data division.
working-storage section.
77 msg-len pic s9(4) comp.
77 msg-out pic x(30).
01 ws-commarea.
05 ws-pgm1 pic x(8).
05 ws-pgm2 pic x(8).
77 temp-data pic x(10).
linkage section.
01 dfhcommarea.
02 ls-commarea.
05 ls-pgm1 pic x(8).
05 ls-pgm2 pic x(8).
Procedure division.
Move ‘PGM1:YES’ to ws-pgm1.
Move ‘PGM2:NO ‘ to ws-pgm2.
Move 16 to msg-len.
exec cics send
from(ws-commarea)
length(msg-len)
erase
end-exec.
exec cics LINK
program(‘PGM2’)
commarea(ws-commarea)
end-exec.
* move ls-commarea to ws-commarea.
* move ls-commarea to temp-data.
* move 10 to msg-len.
exec cics send
from(ws-commarea)
length(msg-len)
erase
end-exec.
Exec cics return
end-exec.
goback.
|
How do we submit JCL’s from CICS Online program?, we can use a TDQ or CICS SPOOL Verbs. So how these CICS SPOOL Verbs differs from TDQ?. The problem with TDQ is that in most of the sites, application developers are not authorized to create TDQ (its sysadmin task ) , not that much flexible, and we are responsible to read TDQ sequentially . So thats how CICS JES commands comes into picture. We can read the Spool data and write into spool. today we are gonna look only submitting the jobs.
The JES-CICS interface is totally depends on SPOOL initialization parm of CICS TS, check with your sysadmin guys whether CICS SPOOL parm is YES or NO. To use JES-CICS, SPOOL keyword must be YES.
Submitting a batch job has 3 steps
1. SPOOLOPEN OUTPUT
We are opening SPOOL for submitting JCL, we need to provide USERID and need to store TOKEN for the connection. We must use the same token till we close the spool. The userId is not RACF ID it must be INTRDR (Internal reader), the token is a 8 bit alphanumeric dataname (PIC x(8).
Snippet.
EXEC CICS SPOOLOPEN OUTPUT
NODE(‘LOCAL’)
USERID(‘INTRDR’)
TOKEN(WS-TOKEN)
RESP(WS-RESP)
END-EXEC.
2. SPOOLWRITE
Is for writing the lines of JCL statements into spool with INTRDR. we should define the data name which holds the JCL statements as a 80 bit length Alpha numeric field (PIC X(80). we must provide the length in FLENGTH of SPOOLWRITE. we must provide the token which we got when we opened spool.
Snippet.
EXEC CICS SPOOLWRITE
FROM(WS-LINE(WS-CNTR))
FLENGTH(LENGTH OF WS-LINE(WS-CNTR))
RESP(WS-RESP)
TOKEN(WS-TOKEN)
END-EXEC
3. SPOOLCLOSE
Okay, we have written our jcl statements to JES; now we need to close the spool connection so the JCL will get submitted. we must provide the token which we got when we opened spool.
Snippet.
EXEC CICS SPOOLCLOSE
RESP(WS-RESP)
TOKEN(WS-TOKEN)
END-EXEC.
Common Abends/Errors.
1. ALLOCERROR
occurs when Dynamic allocation rejected request to allocate input dataset.
2. INVREQ
Can occur if any of the following happens. Unsupported function, Unsupported language, From dataname is missing etc.
3. SPOLBUSY
JES interface is used by another task.
4. LENGERR
Happens when the from dataname contents and FLENGTH value are mismatching, we can always make use of ‘LENGTH OF’ keyword to avoid this.
5. NOTOPEN
Spool report has not been opened.
finally
6 NOSPOOL
this happens when we have no JES subsystem.
Sample program for Submitting JCL from CICS
|
IDENTIFICATION DIVISION.
PROGRAM-ID. SPOOL01.
AUTHOR. SHIBU.T.
*
DATA DIVISION.
WORKING-STORAGE SECTION.
01 WS-JCL.
05 WS-LINE PIC X(80) OCCURS 13 TIMES.
01 WS-TEMP.
05 WS-MSG PIC X(40).
05 WS-RESP PIC S9(8) COMP.
05 WS-CNTR PIC S9(4) COMP.
05 WS-TOKEN PIC X(8).
COPY DFHAID.
*
PROCEDURE DIVISION.
A00100-MAIN-PARA.
MOVE LOW-VALUES TO WS-JCL.
MOVE ‘TEST MESSAGE’ TO WS-MSG.
MOVE ‘//R0318BJJ JOB REGION=0M’
TO WS-LINE(1).
MOVE ‘//MODEL EXEC PGM=IEFBR14’
TO WS-LINE(2).
MOVE ‘//JPAYSLP DD DSN=TSHRCI.PAYROLL.PAYSLIP.GROUP(+1),’
TO WS-LINE(4).
MOVE ‘// DISP=(NEW,CATLG,DELETE),’
TO WS-LINE(5).
MOVE ‘// SPACE=(TRK,5),’
TO WS-LINE(6).
MOVE ‘// DCB=TSHRCI.PAYROLL.PAYSLIP.MODEL,’
TO WS-LINE(7).
MOVE ‘//* VOL=SER=ETRU04,’
TO WS-LINE(8).
MOVE ‘// UNIT=SYSDA’
TO WS-LINE(9).
MOVE ‘//SYSIN DD *’ TO WS-LINE(10).
MOVE ‘//SYSPRINT DD SYSOUT=*’
TO WS-LINE(11).
MOVE ‘/*’ TO WS-LINE(12).
MOVE ‘//’ TO WS-LINE(13).
EXEC CICS SEND
FROM(WS-MSG)
LENGTH(LENGTH OF WS-MSG)
END-EXEC.
* OPEN SPOOL.
EXEC CICS SPOOLOPEN OUTPUT
NODE(‘LOCAL’)
USERID(‘INTRDR’)
TOKEN(WS-TOKEN)
RESP(WS-RESP)
END-EXEC.
IF WS-RESP NOT = DFHRESP(NORMAL)
MOVE SPACES TO WS-MSG
MOVE ‘* OPEN SPOOL.’ TO WS-MSG
EXEC CICS SEND
ERASE
FROM(WS-MSG)
LENGTH(LENGTH OF WS-MSG)
END-EXEC
PERFORM Z00100-EXIT-PARA
END-IF.
* WRITE RECORDS INTO SPOOL
PERFORM VARYING WS-CNTR FROM 1 BY 1 UNTIL
WS-CNTR = 14
EXEC CICS SPOOLWRITE
FROM(WS-LINE(WS-CNTR))
FLENGTH(LENGTH OF WS-LINE(WS-CNTR))
RESP(WS-RESP)
TOKEN(WS-TOKEN)
END-EXEC
END-PERFORM.
IF WS-RESP NOT = DFHRESP(NORMAL)
MOVE SPACES TO WS-MSG
MOVE ‘* WRITE JCL ‘ TO WS-MSG
EXEC CICS SEND
ERASE
FROM(WS-MSG)
LENGTH(LENGTH OF WS-MSG)
END-EXEC
PERFORM Z00100-EXIT-PARA
END-IF.
* CLOSE SPOOL
EXEC CICS SPOOLCLOSE
RESP(WS-RESP)
TOKEN(WS-TOKEN)
END-EXEC.
IF WS-RESP NOT = DFHRESP(NORMAL)
MOVE SPACES TO WS-MSG
MOVE ‘* CLOSE SPOOL’ TO WS-MSG
EXEC CICS SEND
ERASE
FROM(WS-MSG)
LENGTH(LENGTH OF WS-MSG)
END-EXEC
END-IF.
PERFORM Z00100-EXIT-PARA.
*
Z00100-EXIT-PARA.
EXEC CICS RETURN
END-EXEC.
|
When the application finished the execution you can see the job in SPOOL ( with SDSF or whatever).

Well COMMAREA its not a mystery anymore, it’s a very simple, convenient method to transfer data in CICS environment. You can use COMMAREA in a RETUN, XCTL or LINK. Called program can alter the data in the passed COMMAREA, then it will be passed to caller when called program issue a RETURN.
How to use COMMAREA in CICS Program.
We must declare the commarea structure in the working storage section of the program which we are planning to use commarea. Then the same must be declared under DFHCOMMAREA group element in Linkage section of the program. In the called Program the commarea must be defined as the first item in the Linkage section.
e.g.
Working-storage section.
01 WS-COMMAREA.
03 WS-TRANSID PIC X(4).
………
Linkage section.
01 dfhcommarea.
03 ls-commarea pic x(4).
When we use the commarea in a XCTL or a LINK the length of COMMAREA is mandatory. the length data name should be defined as half word binary “ S9(4) comp. When we use COMMAREA in a CICS program, we can track the length of the COMMAREA by using EIBCALEN. This technique is widely used for PSUDO-CONVERSATIONAL programing (I’ll be blogging about PSEUDO-CONVERSATIONAL programming in coming days-please do-visit again).
LIMITATION and ALTERNATIVE TECHNOLOGIES
COMMAREA is as old as CICS so obviously it may-not be a wise choice for todays-programming. By the word todays-programs I’m referring to web-Mainframe-XML programs, because I have seen a lot of applications which gets hell lot of data as XML from java/WEB applications.
Maximum amount of data that a COMMAREA can hold is 32 Kilobytes. I you want to use more than this you can go ahead with using a data set ( Obviously it was an old alter native) or you can use CHANNELS and containers where the limit is the systems limit. ‘ll be blogging about channels and containers in the coming days.
sample program
This is a sample PSEUDO-CONVERSATIONAL CICS program, which is utilizing COMMAREA. Note the lines which in Blue color and BOLD- these are the key-part of our program.
|
Identification division.
program-id. pseu01.
data division.
working-storage section.
01 ws-commarea pic x(4).
01 ws-msg-o.
05 msg-o-data pic x(35).
77 msg-len pic s9(4) comp.
01 ws-msg-2.
05 msg-1 pic x(6).
05 name pic x(5).
05 msg-2 pic x(17).
linkage section.
01 dfhcommarea.
05 ls-trnid pic x(4).
procedure division.
exec cics handle condition
lengerr(TSK-ERR-RTN)
end-exec.
if eibcalen = 0 then
go to TSK1-RTN.
if ls-trnid = ‘TSK2’ then
go to TSK2-RTN
end-if.
TSK1-RTN.
move ‘Enter Your name:’ to msg-o-data.
move 16 to msg-len.
exec cics send
from(msg-o-data)
length(msg-len)
erase
end-exec.
Move ‘TSK2’ to ws-commarea.
exec cics return
transid(‘TSK1’)
commarea(ws-commarea)
length(4)
end-exec.
TSK2-RTN.
exec cics receive
into(name)
length(msg-len)
end-exec.
move ‘Hello,’ to msg-1.
move ‘ welcome to CICS.’ to msg-2
move 28 to msg-len.
exec cics send
from(ws-msg-2)
length(msg-len)
erase
end-exec.
exec cics return
end-exec.
TSK-ERR-RTN.
move low-values to msg-o-data.
move ‘something goes wrong with leng.’ to msg-o-data.
move 32 to msg-len.
exec cics send
from(msg-o-data)
length(msg-len)
erase
end-exec.
exec cics return
end-exec.
|


![clip_image002[12] clip_image002[12]](https://mainframegeek.files.wordpress.com/2011/10/clip_image00212_thumb.jpg?w=534&h=386)
![clip_image002[32] clip_image002[32]](https://mainframegeek.files.wordpress.com/2011/10/clip_image00232_thumb.jpg?w=524&h=378)
![clip_image002[8] clip_image002[8]](https://mainframegeek.files.wordpress.com/2011/10/clip_image0028_thumb.jpg?w=522&h=376)
![clip_image002[10] clip_image002[10]](https://mainframegeek.files.wordpress.com/2011/10/clip_image00210_thumb.jpg?w=521&h=376)
![clip_image002[14] clip_image002[14]](https://mainframegeek.files.wordpress.com/2011/10/clip_image00214_thumb.jpg?w=524&h=378)
![clip_image002[16] clip_image002[16]](https://mainframegeek.files.wordpress.com/2011/10/clip_image00216_thumb.jpg?w=527&h=380)
![clip_image002[18] clip_image002[18]](https://mainframegeek.files.wordpress.com/2011/10/clip_image00218_thumb.jpg?w=531&h=383)
![clip_image002[22] clip_image002[22]](https://mainframegeek.files.wordpress.com/2011/10/clip_image00222_thumb.jpg?w=531&h=383)
![clip_image002[24] clip_image002[24]](https://mainframegeek.files.wordpress.com/2011/10/clip_image00224_thumb.jpg?w=535&h=386)
![clip_image002[26] clip_image002[26]](https://mainframegeek.files.wordpress.com/2011/10/clip_image00226_thumb.jpg?w=533&h=384)

![clip_image002[6] clip_image002[6]](https://mainframegeek.files.wordpress.com/2011/10/clip_image0026_thumb.jpg?w=529&h=381)
![clip_image002[28] clip_image002[28]](https://mainframegeek.files.wordpress.com/2011/10/clip_image00228_thumb.jpg?w=525&h=379)
![clip_image002[30] clip_image002[30]](https://mainframegeek.files.wordpress.com/2011/10/clip_image00230_thumb.jpg?w=523&h=377)
![clip_image002[34] clip_image002[34]](https://mainframegeek.files.wordpress.com/2011/10/clip_image00234_thumb.jpg?w=520&h=375)
![clip_image002[36] clip_image002[36]](https://mainframegeek.files.wordpress.com/2011/10/clip_image00236_thumb.jpg?w=523&h=377)
![clip_image002[38] clip_image002[38]](https://mainframegeek.files.wordpress.com/2011/10/clip_image00238_thumb.jpg?w=530&h=364)


